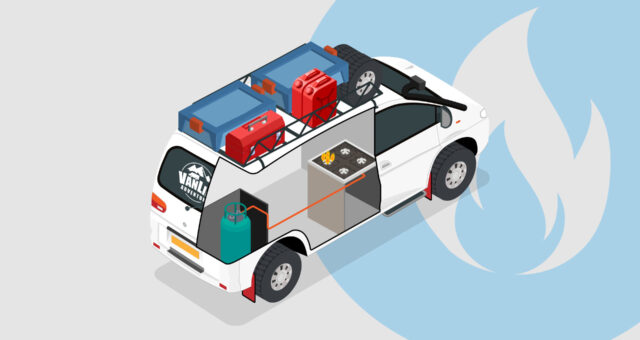
When planning your campervan conversion, you’ll no doubt want to use electronic devices for extended periods when parked in a stationary position with your engine off. These devices can be low consumption items such as L.E.D. lights, 12V power sockets through to the more power demanding items such as a 12V cool box/fridge, a power inverter and so on.
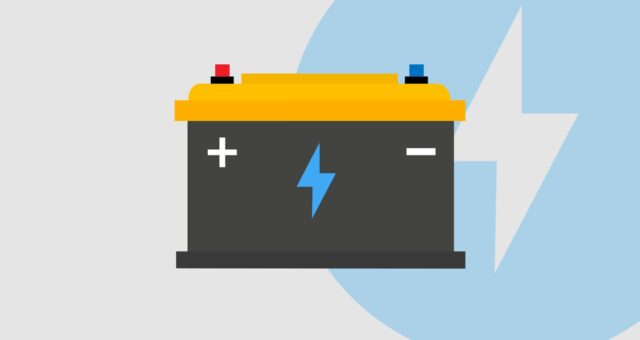
The standard solution is to fit one or more leisure batteries and create an additional electrical system aboard your campervan. This system often referred to as your auxiliary power system, is then used to power all additional electronic devices. However, as you now have an additional electrical system, you will now require a way of keeping the new batteries in the additional system fully charged.
The most popular solution is to install a split-charge system.
What is split charging?

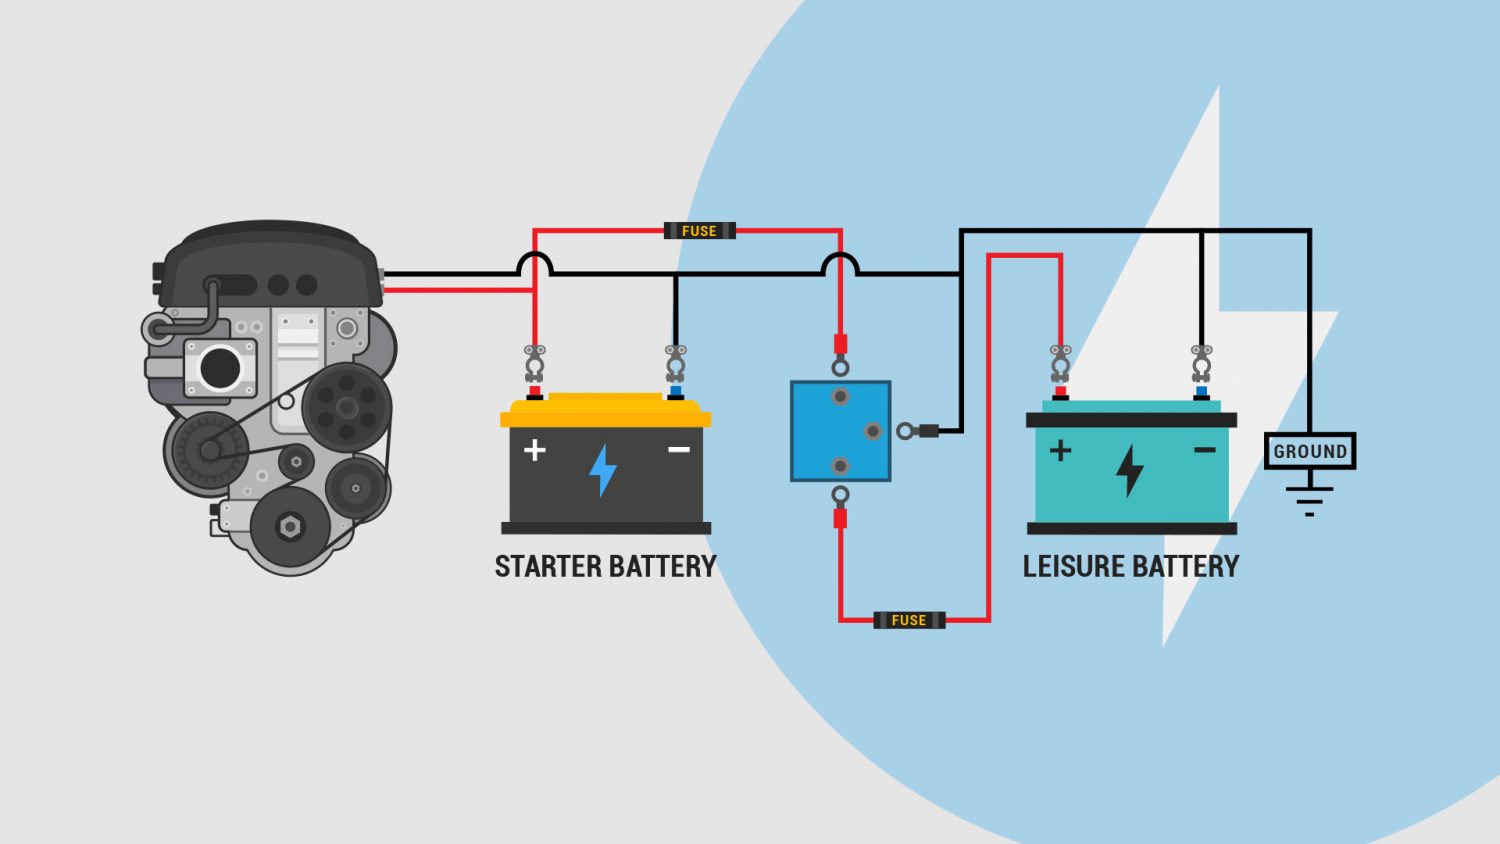
Split charging is the term used to describe the simultaneous charging of a vehicle starter battery (crank battery) and leisure battery (or batteries) from a common charging source. The charging source is typically the vehicles alternator.
How Does Split-Charging System Work?

A typical campervan split-charging system works as follows;
- Connected to your vehicle’s primary electrical system is a conductor (high-current cable). Depending on the split charge method, the connection point is either located at the vehicle starter battery or alternator.
- This high-current cable is then run through the vehicle (usually through the bulkhead and hidden under interior trim) where it is then connected to the input terminal of a split charge device. (A spilt charge device allows power to flow under the right conditions)
- Finally, a second high-current cable is connected from the output terminal of the split charge device and connected to an auxiliary battery (deep-cycle/leisure battery).
What Is A Split-Charge Device?
A split-charge device is an electronic component that fundamentally acts as a switch.
How Does A Split-Charge Device Work?
The job of a split charge device is to allow power to flow only when the vehicle engine is in operation or when your alternator generates a certain voltage (depending on the split-charge device type).
The split-charge device will then disconnect the connection between the two batteries once it detects a drop in incoming power. This effectively isolates both batteries.
The main switching operation can be done either manually or electronically.
Why Do I Need A Split-Charge Device?

If you were to create a permanent live connection by connecting a cable from your starter battery to your leisure battery without installing a split-charge device in the circuit, in theory, yes, you could efficiently keep your leisure battery charged.
However, this option is only practical while your engine is running as the engine has to be running for the vehicle alternator to create the additional power to charge both the starter and leisure battery. The first problem you may face is when in a stationary position with the engine off.
When you start using electronic devices that are connected to your separate auxiliary electronic system, as there is now a permanent live connection between both the starter battery and leisure battery, the current will be drawn from both batteries simultaneously. The main problem you may face is draining too much power from your starter battery. This will inevitably lead to not being able to start your vehicle back up. Furthermore, a starter battery and leisure battery are two distinct types of batteries.
A starter battery (crank battery) is designed for short bursts of high current flow (turning over the engine), whereas a leisure battery is designed for slow-drain, low-current use (running a low-power L.E.D. light over an extended period). As a result, having your crank battery permanently connected into your auxiliary power system can potentially damage your starter battery.
Likewise, you could also damage your leisure battery when starting your vehicle as power will be drawn from both batteries. By installing a split charge device, when you now use electronic devices that are connected to your auxiliary system without the engine on, the power will only be taken from your leisure battery.
This means that if you were to drain all the power in your leisure battery accidentally (not advisable), you will still have a way of starting your vehicle and that will then charge up your leisure battery.
Smart Alternators
As mentioned earlier, the common charge source for a split-charge system is the vehicle alternator. However, due to the push for evermore efficient vehicles, each year, all vehicle manufactures must now meet more demanding emission and environmental standards. Over the last decade, these standards have increased to keep inline with local and national guidelines.
As a result, many modern vehicles now come with a variety of mechanical and electrical advancements; all in aid of reducing emissions. One particular device is a ‘smart alternator’
What Is A Smart Alternator compared to a traditional alternator?
A fixed voltage alternator (traditional alternator) typically produces a near-constant 14-volts of electricity when the engine is active.
On the other hand, a smart alternator, also known as a variable voltage alternator, allows the vehicles E.C.U. to control the output voltage and current based on the engines operating conditions.
As a result, a smart alternator efficiently reduces the electrical load that in turn reduces the mechanical load on the engine.
How Does A Smart Alternator Affect My Split-Charge System?
Unfortunately, when a smart alternator is running in its ‘low-power mode’, the voltage produced will not efficiently charge a secondary battery.
Furthermore, certain split charge device types (primarily a V.S.R.) will not operate effectively due to the fluctuation of voltage caused by the smart alternator.
What Vehicles Are Fitted With A Smart Alternator?
Vehicles manufactured before 2015 are almost always fitted with a traditional alternator. Whereas vehicles manufactured after 2015 typically come fitted with a smart alternator as standard.
However, commercial vehicles (vans, trucks) tend to be a little slower when it comes to the adoption of new emission-reducing technologies. Even so, if the trim level or your vehicle is classified as an economical variant (ecoBoost, BlueMotion, BlueTec etc), there’s a strong possibility your vehicle has a smart alternator.
How Do I Know If My Van Has A Smart Alternator?
When selecting the appropriate split charge device, it is important to figure out what type of alternator if fitted aboard your vehicle.
There are two methods to find out if your vehicle has a smart alternator.
- Check With Your Vehicle Manufacturer/Dealership.
For a definitive answer, consult your vehicles manufacturer or dealership.
2. Perform A Manual Check.
This involves using a voltmeter on your starter battery positive terminal to check the voltage coming from your alternator when your engine is operational.
It is important that if you do carry out this test that you make sure all electronic devices fitted to your vehicle such as fans, radio, lights etc. are turned off AND should be done around ten minuets of engine idle.
In short, If you take a power reading and is around 14-volts DC, then you most likely have the traditional, non-smart alternator.
If the power level is between 12.5 to 13.5 volts DC, your vehicle is more than likely fitted with a smart alternator.
Can I Install A Split Charge System If My Vehicle Has A Smart Alternator?
As one technology advances, so does another. A relatively new split-charge device type (battery-to-battery charger) allows you to efficiently charge both the starter and leisure battery to 100%.
Split Charge Device Types
Device 1: 12-Volt Manual Switch

Quick Overview
A 12-volt switch is the most basic split-charge device you can install in a split charge system.
Advantages
- Straightforward
- Reliable
- Low-cost
Disadvantages
- Primitive
- Have to remember to set the switch back to off when the engine is not running
- No fast charge option
- Not very efficient
- Not advisable for smart alternators
What Is A 12-volt Manual Switch?
A 12-volt switch is a device for making and breaking a connection in an electric circuit.
How Does A 12-Volt Manual Switch Work In A Split Charge System?
Installation Location
For easy-access, a 12-volt switch is typically located near the drivers console.
Device
- Power In Terminal. – This is connected directly to the starter battery using a high-current cable.
- Power Out Terminal. – This is connected directly to the leisure battery using a high-current cable.
Process
Once your engine is running, you set the switch to its ‘on’ position. Power will now flow from your vehicle alternator via the starter battery to your leisure battery. When the engine is off, set the switch to its ‘off’ position. This successfully stops the flow of electrical current and isolates each battery.
What We Think
Although a 12-volt switch is a simple and low cost solution, users who opt for this method may experience a few problems.
You have to remember to manually set the switch to the off position every time you turn off the engine.
Failure to do so may leave you vulnerable to flattening the starter battery.
However, this split charge device may appeal to the installers who are keeping to a low budget and are after a quick and simple solution.
Products We Recommend
Device 2: 12-Volt Relay (Manual Split Charge Relay)

Quick Overview
A 12-volt relay is similar to a 12-Volt switch, except the main ‘switching method’ is done via a low electrical input. This input only becomes live once the vehicle’s ignition is switched to the on position.
Advantages
- Straightforward
- Reliable
- Low-cost
- Easy to replace
Disadvantages
- Primitive
- Internal moving contacts can wear out
- Not very efficient
- No fast charge option
- Not advisable for smart alternators
What Is A 12-volt Relay?
A 12-volt relay, often referred to as a manual split charge relay is an electrical device that uses an electromagnet to pull a set of contacts that make or break a circuit.
How Does A 12-Volt Relay Work In A Split Charge System?
Installation Location
A 12-volt relay is typically installed in the engine bay near the starter battery.
Terminals
Depending on the device type, a 12-volt relay typically consists of four electrical terminals.
- Controller Terminal. This terminal connects to a 12-volt power source that becomes ‘live’ once the ignition is switched on.
- Power In Terminal. This terminal connects to the starter battery terminal via a high-current cable.
- Power Out Terminal. This terminal connects to the leisure battery terminal via a high-current cable.
- Negative Terminal. This terminal connects to a ground point via a low-current wire.
Process
Once the controller wire becomes active (ignition switched on), the electromagnet inside the relay becomes ‘energised’. Electromagnet inside the device will now energise connecting the contacts inside to create a closed-circuit Power will now flow efficiently from your vehicle alternator via the starter battery to your leisure battery.
When you switch off the ignition, the controller wire will lose power. As a result, the electromagnet inside the device will release the contacts breaking the circuit. This is known as its ‘rest’ phase. This successfully stops the flow of electrical current and isolates each battery.
What We Think
Before the availability of more intelligent split charge device types, this was the most common split charge device to install.
Although this type of relay is still available today, many installers are wary of tapping directly into their vehicles electrical system in case of damage to the vehicles electrical system.
This could also affect the warranty of their vehicle.
Products We Recommend
For users who would prefer this method, we have listed what we believe are the very best products to choose.
| Product | Image | Power Rating | Price |
|---|---|---|---|
| Ehdis 12V Relay |  | 200A | Check On Amazon |
| Ofnmy 12V Relay |  | 200A | Check On Amazon |
Device 3: Voltage Sensitive Relay (V.S.R)

Quick Overview
A voltage-sensitive relay, otherwise known as a V.S.R, is the most common split charge device used in a campervan split charge system. A V.S.R. provides the user with a simple, reliable way of splitting power from the starter battery to the auxiliary battery.
Advantages
- Intelligent
- Automatic operation
- Low-cost
- Simple to install (you don’t need to modify the factory-fitted electrical system – so no warranty issues).
- Dual-sensing
- Certain models feature a manual override switch.
Disadvantages
- Internal contacts can eventually wear out
- No fast charging option
- Not advisable for smart alternators
What Is A Voltage Sensitive Relay?
A V.S.R. is an electronic device that intelligently monitors the incoming voltage. Once the input voltage reaches a certain level, the device uses an electromagnet to pull a set of contacts inside the device to make or break a circuit.
How Does A Voltage Sensitive Relay Work In A Split Charge System?
Installation Location
A V.S.R. is typically installed in the engine bay near the starter battery. However, some installers prefer to install the V.S.R. at the opposite end near the leisure battery.
Device
Depending on the relay type, the device typically consists of three electrical terminals.
- Power In Terminal. This terminal connects to your starter battery via a high-current cable.
- Power Out Terminal. This terminal connects to your leisure battery via a high-current cable.
- Negative Terminal (ground). This terminal connects to a ground point via a low-current wire.
V.S.R. energising level
A voltage-sensitive relay works by monitoring the power level on both the power in (1) and power out (2) terminals. The V.S.R. will ‘energise’ once the voltage reaches a certain level. This is usually around 13.8-volts.
A 12-volt battery is between 12.8 to 13-volts of electricity when fully charged. Whereas an alternator will typically produce between 13.8 to 14.6 volts of electricity when active.
Process
When a vehicle engine is running, the V.S.R. detects the increased voltage coming from the alternator and then energises the electromagnet inside the relay creating a closed-circuit. Electrical current now flows from your vehicle’s alternator via the starter battery, through the V.S.R. and into your leisure battery.
Turing the engine off, the relay detects the drop in power. The electromagnet inside the device releases the contacts breaking the circuit. The V.S.R. is now in its ‘rest’ phase. This device successfully stops the flow of electrical current isolating each battery.
What We Think
A voltage-sensitive relay is the most common split charge device and for good reason. They’re simple to fit, reliable, and are cheap compared to more advanced technologies. Many voltage-sensitive relays are dual-sensing. This means that both the power in (1) and power out (2) inputs monitor the voltage level and will activate the V.S.R. when the voltage exceeds the activation level. This happens when using another charging method simultaneously with your split charge system. (solar, hook-up). This is great as it allows power to flow back into the starter battery.
Moreover, some devices feature an emergency manual override switch. This allows the user to manually activate the V.S.R. for a short period. This feature is useful if the starter battery has a low charge level and needs a brief boost of power.
Another excellent feature is that some of the more intelligent voltage-sensitive relays can monitor the voltage of the vehicle over a long period. Once the device has enough data of the electric system, it is then used to activate the relay at a more accurate voltage level. As vehicles can suffer from voltage fluctuations, this feature should help eliminate unwanted opening and closing of the relay.
Products We Recommend
| Product | Image | Power Rating | Price |
|---|---|---|---|
| Durite Voltage Sensitive Relay |  | 140A | Check On Amazon |
| H&C Cargo Voltage Sensitive Relay |  | 140A | Check On Amazon |
Device 4: Charge Splitter/Battery Isolator

Quick Overview
A charge splitter uses diodes to stop the flow of electrical current between each battery.
Advantages
- No moving parts
- Reliable
- One-way power flow
Disadvantages
- Significant voltage drop
- Can become hot when operating
- No fast charge option
- Not advisable for smart alternators
What Is A Charge Splitter?
A charge splitter (sometimes referred to as a battery isolator) is an electrical device that divides the incoming current into multiple branches and only allows the current to flow in one direction in each branch with the use of diodes.
How Does A Charge Splitter Work In A Split Charge System?
Installation Location
A charge splitter is typically installed in the engine bay and is located close to the starter battery.
Device
Depending on the type of device, a typical charge splitter consists of three electrical terminals.
- Power In Terminal. This terminal is connected to your alternator via a high-current cable.
- Power Out Terminal [1]. This terminal is connected to your leisure battery via a high-current cable.
- Power Out Terminal [2]. This terminal is connected to your leisure battery via a high-current cable.
Process
When the engine is running, the electrical current generated by the alternator flows through a high-current cable into the charge splitter. From here, the power is evenly split inside the unit and directed down individual diodes (a diode only allows an electric current to pass in one direction). At the opposite end of each diode is an electrical terminal.
Using high-current cables, one electrical terminal is connected back to the starter battery, and the other electrical terminal is connected to the auxiliary battery. Electrical current successfully flows to each battery giving an even charge. Once the engine off is turned off, as the connection is through individual diodes, power cannot flow between each battery. All flow of electrical current stops isolating each battery.
What We Think
At first look, a charge splitter looks like the ideal split charge device. However, one of their biggest flaws is that the electrical current running through a diode suffers from a drop in voltage. This is usually around 0.4 to 0.8 volts. Although this may seem an insignificant amount, the reduced voltage leaving the device is quite significant when working within a 12-volt system.
As a result, this means each battery will not get the total voltage coming from the alternator. Therefore this prevents both batteries from being charged to their maximum capacity respectively.
Another common issue with a charge splitter is that the device becomes hot when operating under high loads.
Device 5: Battery-to-Battery (D.C. to D.C.) Charger

Quick Overview
If you’re after the very best in battery charging efficiency, then a battery-to-battery charger is the device to choose.
Advantages
- Fast charge
- Maximised charging for better battery life and performance
- Built-in solar M.P.P.T. Charge Controller (certain models)
- Advisable for smart alternators
Disadvantages
- Expensive
What is a battery-to-battery charger?
A battery-to-battery charger, also known as a D.C. to D.C. charger, is an electronic device that takes the power coming from the alternator and then boosts or reduces the power in a controlled way.
This then provides a stable multi-stage voltage output which provides a 100% re-charge for both your starter and auxiliary battery.
How does a battery-to-battery charger work?
Terminals
A battery-to-battery charger typically consists of four electrical terminals (depending on make/model).
- Power In
- Power out
- Negative
- Controller
Solar M.P.P.T. Charge Controller
Certain models feature an inbuilt M.P.P.T. solar panel charge controller. This is an excellent addition if you plan on installing a solar power system aboard your campervan.
Battery Temperature Sensor
Certain models feature a temperature sensor for optimised charging, regardless of weather conditions.
Note to reader: More content coming soon.
What We Think
If you’re after the very best in ‘smart’ battery charging, then a battery-to-battery charger is the best option.
What Is The Best Split Charge System For My Campervan?

Choosing the best split charge system for your vehicle will ultimately be based on personal preferences as well as what alternator is fitted to your vehicle.
Listed below are what we believe are the best use-case scenarios.
Vehicles Fitted Without A Smart Alternator
Our Recommendation: 12-volt Switch
If you’re keeping to a super-low budget, then you can’t go wrong with a simple switch and cable.
Everyday Traveller
Our Recommendation: V.S.R.
A V.S.R. is the perfect balance in value and efficiency. You get a relatively good charge without having to worry about turning on any type of switch.
Ultimate Efficiency
Answer: Battery-to-battery Charger
If you are the type of traveller that aims for the ultimate in efficiency, then choosing a battery-to-battery charger is going to be your best option. They offer the very best in split charging performance.
Vehicles Fitted With A Smart Alternator
Answer: Battery-to-battery Charger
All vehicles fitted with a smart alternator must be fitted with a battery-to-battery charger.
Frequently Asked Questions
Why Should I Install A Split Charging System Aboard My Campervan?
The main reason you should install a split charge system aboard your campervan is to charge your additional battery. It also costs less to install a split charge system compared to a solar charge system and a shore-charge system respectively.
How Do I Choose The Correct Split Charge Device?
It is essential to install a split charge device that can handle the maximum power produced by your vehicles alternator. To work out the correct power rating, you will first have to check any technical documents for your exact vehicle. These can usually be found on the website of your vehicles manufactures. For older vehicles, online forums such as Facebook groups and vehicle-specific internet forums can be an excellent resource. Once you find out the rating of your alternator, choose a split charge device that rating that is higher.
How Do I Correctly Size My Split Charge Cables?
All split charge cables responsible for high-current load should be rated to handle the maximum current the alternator is capable of supplying. To work out the correct size of the cable, you will have to find out the maximum power your vehicle alternator can produce. Failure to fit correctly rated cable sizes can result in permanent damage to your batteries, split charge unit and other electrical devices. In a worst-case scenario, it can cause an electrical fire which can have disastrous consequences.
Can I Combine The Leisure Battery To The Starter Battery In An Emergency?
Yes. A leisure battery can be connected to a starter battery in an emergency. However, you should only combine your leisure battery to re-charge the starter battery to a sufficient level so that the starter battery can independently start the engine. A leisure battery should not be connected to the starter battery when cranking the engine.
How Do I Combine The Leisure Battery To The Starter Battery In An Emergency?
Combining your batteries in an emergency can be a great feature to have. However, not all split charge devices allow such operation. One option is to install a separate cable and switch system that bypasses your split charge device. This would then give you the option to combine both batteries no matter what split-charge device is installed.
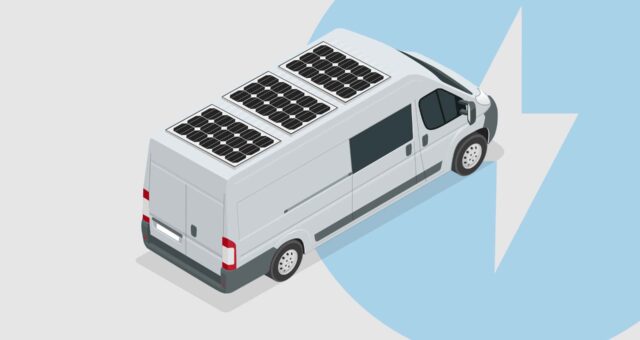
What Are Other Ways To Charge The Leisure Battery In My Campervan?
There are two other ways you can charge up your leisure battery aboard a campervan that does not involve your alternator.
1. Hook-up Charge System. Connecting your battery to an A.C. to D.C. battery charger that is plugged in to the national grid.
2. Solar Power Charge System. Installing a solar panel system aboard your campervan.